Arsip Kategori: BERITA TERKINI

The Guide to Trading on Binance Futures

How to open a Binance Futures account

Video tutorial available here
Before opening a Binance Futures account, you need a regular Binance account. If you don’t have one, you can go to Binance and click on Register in the top right corner of your screen. Then follow these steps:
  1. Enter the email address that you would like to use, and choose a safe password. If you have a referral ID, paste it in the referral ID box. For a 10% discount on spot/margin trading fees, you can use this link.

    How to open a binance futures account

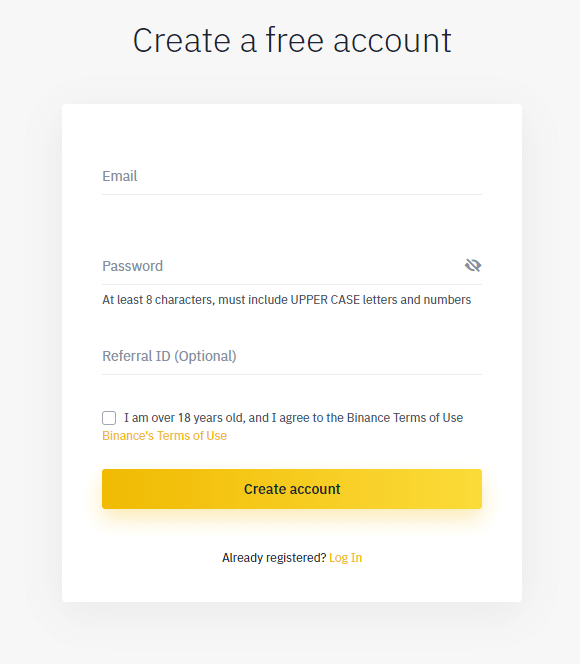
  2. When you are ready, click on Create account.
  3. You will receive a verification email shortly. Follow the instructions in the email to complete your registration.
Next, log in to your Binance account, move your mouse to the bar at the top of the page, hover over Futures, and click on Futures.
How to open a binance futures account
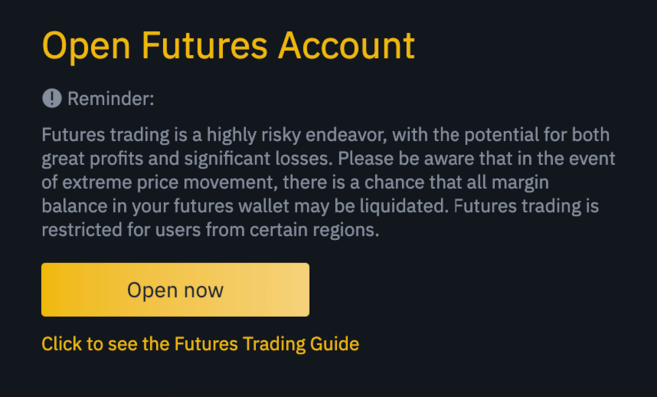
Once you are on the Binance Futures page, you should be able to see the first two characters of your email address associated with your account in the top right corner.
How to open a binance futures account
Click on the Open now button in the bottom right corner to activate your Binance Futures account. And that’s it, you’re ready to trade!
How to open a binance futures account
If you are not familiar with trading futures contracts, we recommend reading the articles What Are Forward and Futures Contracts?, and What Are Perpetual Futures Contracts? before getting started.
You may also refer to the Binance Futures FAQ to get an overview of the contract specifications. 
 If you would like to test out the platform without risking real funds, you can try out the Binance Futures testnet

How to fund your Binance Futures account

Video tutorial available here
You can transfer funds back and forth between your Exchange Wallet (the wallet that you use on Binance) and your Futures Wallet (the wallet that you use on Binance Futures).
If you don’t have any funds deposited to Binance, we recommend reading the guide How to Deposit on Binance.
To transfer funds to your Futures Wallet, click on Transfer in the bottom right corner of the Binance Futures page. Set the amount that you would like to transfer, and click on Confirm transfer. You should be able to see the balance added to your Futures Wallet shortly. 
How to open a binance futures account

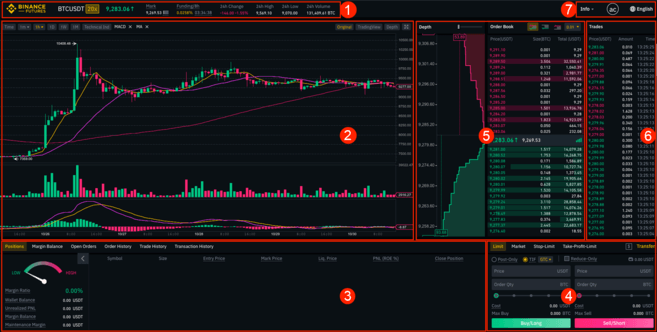
Binance Futures interface guide

How to open a binance futures account
  1. This is where you can:
    1. Check and adjust your leverage (20x by default).
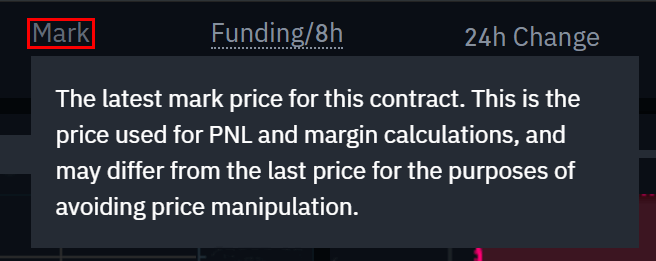
    2. Check the Mark Price (important to keep an eye on, as liquidations happen based on the Mark Price).
    3. Check the expected funding rate.
    4. Monitor your position in the auto-deleverage queue (important to pay attention to during periods of high volatility).
    5. Check various other market data, such as 24h change and 24h volume.
  2. This is your chart. In the top right corner of this area, you can switch between the Original or the integrated TradingView chart, or get a real-time visual representation of the current order book depth by clicking on Depth.
  3. This is where you can monitor your trading activity. You can switch between the tabs to check the current status of your positions, your margin balance, see your currently open and previously executed orders, and get a full trading and transaction history for a given period.
  4. This is where you can enter your orders, and switch between different order types. This is also where you can check your fee tier, and transfer funds from your Binance account.
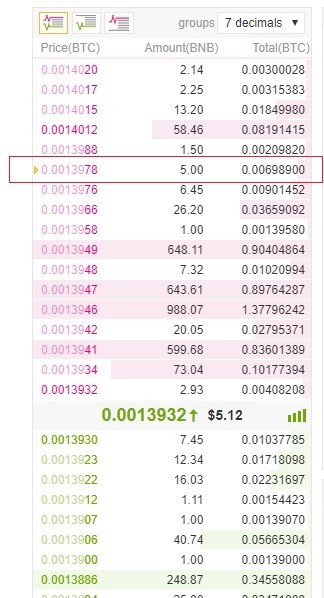
  5. This is where you can see live order book data along with a visualization of order depth. You can adjust the accuracy of the order book in the dropdown menu on the top right corner of this area (0.01 by default).
  6. This is where you can see a live feed of the trade history of Binance Futures.
  7. By hovering on Info, you can get access to the Futures FAQ, check the historical funding rates, and the current balance of the Insurance Fund. If you wish to log out of Binance Futures, you can also do that from here. 

How to adjust your leverage

Video tutorial available here
Binance Futures allows you to adjust the leverage manually. To do so, go to the top of the page, and click on the yellow box indicating your current leverage amount (20x by default). Specify the amount of leverage by adjusting the slider, or by typing it in, and click on Confirm.
How to adjust your leverage
It is worth noting that the larger the position size is, the smaller the amount of leverage is that you can use. Similarly, the smaller the position size, the larger the leverage you can use.
Please note that using higher leverage carries a higher risk of liquidation. Novice traders should carefully consider the amount of leverage that they use. 

What is the difference between mark price and last price?

To avoid spikes and unnecessary liquidations during periods of high volatility, Binance Futures uses last price and mark price.
Last price is easy to understand. It means the last price that the contract was traded at. In other words, the last trade in the trading history defines the last price. Last price is used for calculating your realized PnL (Profit and Loss).
Mark price is designed to prevent price manipulation. The mark price is calculated using a combination of funding data and a basket of price data from multiple spot exchanges. Mark price is used for liquidations and calculating your unrealized PnL.
What is the difference between mark price and last price
Please note that the mark price and the last price may differ. 
When you set an order type that uses a stop price as a trigger, you can select which price you would like to use as the trigger – the last price or the mark price. To do this, select the price you wish to use in the Trigger dropdown menu in the order entry field.
Binance Futures Banner

What order types are available and when to use them?

There are six order types that you can use on Binance Futures:
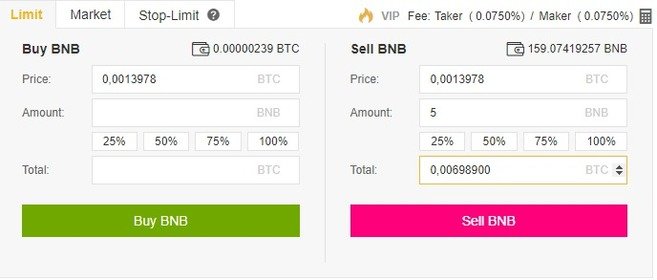
  • Limit: A limit order is an order that you place on the order book with a specific limit price that is determined by you. When you place a limit order, the trade will only be executed if the market price reaches your limit price (or better). Therefore, you may use limit orders to buy at a lower price, or to sell at a higher price than the current market price.
  • Market: A market order is an order to buy or sell at the best available current price. It is executed against the limit orders that were previously placed on the order book. When placing a market order, you will pay fees as a market taker.
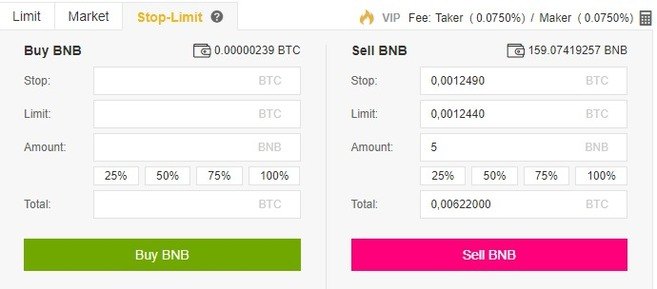
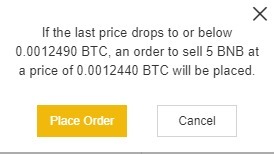
  • Stop-Limit: The easiest way to understand a stop-limit order is to break it down into stop price, and limit price. The stop price is simply the price that triggers the limit order, and the limit price is the price of the limit order that is triggered. This means that once your stop price has been reached, your limit order will be immediately placed on the order book.
    Although the stop and limit prices can be the same, this is not a requirement. In fact, it would be safer for you to set the stop price (trigger price) a bit higher than the limit price for sell orders, or a bit lower than the limit price for buy orders. This increases the chances of your limit order getting filled after the stop price is reached.
  • Stop-Market: Similarly to a stop-limit order, a stop-market order uses a stop price as a trigger. However, when the stop price is reached, it triggers a market order instead.
  • Take-Profit-Limit: If you understand what a stop-limit order is, you will easily understand what a take-profit-limit order is. Similarly to a stop-limit order, it involves a trigger price, the price that triggers the order, and a limit price, the price of the limit order that is then added to the order book. The key difference between a stop-limit order and a take-profit-limit order is that a take-profit-limit order can only be used to reduce open positions.
    A take-profit-limit order can be a useful tool to manage risk and lock in profit at specified price levels. It can also be used in conjunction with other order types, such as stop-limit orders, allowing you to have more control over your positions.
    Please note that these are not OCO orders. For example, if your stop-limit order is hit while you also have an active take-profit-limit order, the take-profit-limit order remains active until you manually cancel it.
  • Take-Profit-Market: Similarly to a take-profit-limit order, a take-profit-market order uses a stop price as a trigger. However, when the stop price is reached, it triggers a market order instead.

What is Post-Only, Time in Force and Reduce-Only?

When you use limit orders, you can set additional instructions along with your orders. On Binance Futures, these can either be Post-Only or Time in Force (TIF) instructions, and they determine additional characteristics of your limit orders.
Post-Only means that your order will always be added to the order book first and will never execute against an existing order in the order book. This is useful if you would only like to pay maker fees. You can quickly check your current fee tier by hovering over the $ sign next to the Transfer button.
TIF instructions allow you to specify the amount of time that your orders will remain active before they are executed or expired. You can select one of these options for TIF instructions:
  • GTC (Good Till Cancel): The order will remain active until it is either filled or canceled.
  • IOC (Immediate Or Cancel): The order will execute immediately (either fully or partially). If it is only partially executed, the unfilled portion of the order will be canceled.
  • FOK (Fill Or Kill): The order must be fully filled immediately. If not, it won’t be executed at all.
Additionally, when you use either a limit or a market order, ticking the Reduce-Only checkbox will ensure that new orders you set will only decrease, and never increase your currently open positions.

When are your positions at risk of getting liquidated?

Liquidation happens when your Margin Balance falls below the required Maintenance Margin. The Margin Balance is the balance of your Binance Futures account, including your unrealized PnL (Profit and Loss). So, your profits and losses will cause the Margin Balance value to change.
The Maintenance Margin is the minimum value you need to keep your positions open. It varies according to the size of your positions. Larger positions require higher Maintenance Margin.
You can find a useful tool under the Positions tab at the bottom left corner of the page. It helps you quickly track the current risk of your open positions getting liquidated. If your Margin Ratio reaches 100%, your positions will be liquidated.
When are your positions at risk of getting liquidated
When liquidation happens, all of your open orders are canceled. Ideally, you should keep track of your positions to avoid auto-liquidation, which comes with an additional fee. If your position is close to being liquidated, it may be beneficial to consider manually closing the position instead of waiting for the auto-liquidation.

What is auto-deleveraging and how can it affect you?

When a trader’s account size goes below 0, the Insurance Fund is used to cover the losses. However, in some exceptionally volatile market environments, the Insurance Fund may be unable to handle the losses, and open positions have to be reduced to cover them. This means that in times like these, your open positions can also be at risk of being reduced.
The order of these position reductions is determined by a queue, where the most profitable and the highest leveraged traders are at the front of the queue. You can check your current position in the queue by hovering over the indicator at the top of the page.

how to Binance DEX: Accessing Your Wallet

how to Binance DEX, Accessing Your Wallet

To start, navigate to the Binance DEX (or testnet if you wish to test using testnet funds) and click on “Unlock Wallet” in the upper right-hand corner of your screen.
Binance DEX: Accessing Your Wallet
From here you are able to select the method on how you would like to unlock your wallet.
There are 3 methods to unlock your wallet:
  1. WalletConnect (Recommended)
  2. Ledger Device (Recommended)
  3. Keystore File (NOT Recommended)

WalletConnect (recommended)

The easiest way to access your Binance DEX wallet. WalletConnect easily integrates with Trust Wallet (Binance’s official recommended wallet) and CoolWallet S. 
To get started, open the Binance DEX and click on WalletConnect. From here, click on the “Get WalletConnect QR Code” button.
WalletConnect
Open Trust Wallet (or download it if you do not have it yet) and click on the button in the upper left-hand corner of the wallet and then click “WalletConnect”. This will open your camera for you to scan the QR Code generated by Binance DEX.
WalletConnect
Once you scan the QR code, approve access and you will be connected to the Binance DEX with your Trust wallet using WalletConnect. 

Ledger Device (recommended)

In order to use your Ledger hardware wallet with the Binance Chain, first you must install the Binance Chain application onto your Ledger from the Ledger Live manager. 
Binance DEX: Accessing Your Wallet
Once the Binance Chain application is installed on your Ledger, unlock your Ledger by entering your pin code. 
Binance DEX: Accessing Your Wallet
After unlocking your device, you will be on the menu of the Ledger, open up the Binance Chain application
Binance DEX: Accessing Your Wallet
When you open up the Binance Chain application, you will see a message saying “Binance Chain Ready”


Binance DEX: Accessing Your Wallet

While the application is open, you can unlock your wallet and trade on the DEX by navigating to the Binance DEX (or testnet if you wish to test using testnet funds) and clicking on “Unlock Wallet” in the upper right-hand corner of your screen. From here, select “Ledger Device” and click on “Connect to Ledger”.
Binance DEX: Accessing Your Wallet

Keystore File (not recommended)

In order to unlock your wallet using a keystore file either upload your keystore file by clicking on the “Upload keystore file” button or drag and drop your keystore file into the button.
You will then need to enter the password you first set up with your keystore file to unlock your wallet. This password will also act as a session password to protect your account after a period of inactivity.
Binance DEX: Accessing Your Wallet

Once you have unlocked your wallet, you will be on the trading interface of the Binance DEX. Continue through to our article on navigating the Binance DEX to learn how to use the interface.

How to Binance DEX: Creating a Wallet

How to Binance DEX: Creating a Wallet

To start, navigate to the Binance DEX (or testnet if you wish to test using testnet funds) and click on “Create Wallet” in the upper right-hand corner of your screen.
You will be prompted with a tutorial on how to create a wallet directly on the website.
As a Binance DEX user, you will hold full custody of your funds. No one, not even Binance will be able to help you recover your wallet if you lose your private key, mnemonic phrase or keystore file. 
Upon creating a wallet, the following will be generated for you. Please store them securely.
  • Keystore (encrypted & password protected)
    • A keystore file contains your private key along with your public key and address (both of which are derived from your private key). This file is encrypted and password protected. This is the recommended way to access your wallet if you do not have access to a supported hardware device. 
  • Mnemonic Phrase
    • A mnemonic phrase is generated based on a BIP39 word list – this phrase allows you to access your wallet, but should not be used regularly. It is recommended you only use your mnemonic phrase as a backup
  • Private Key
    • This allows you to access your wallet, but should not be used regularly. It is recommended you only use your private key as a backup
In order to create a keystore file, you will need to assign a password that will be used to access the file. When logging into the Binance DEX, this password will also function as your session password.
Once you have entered your password, click “Download Keystore File”.

Binance DEX: Creating a Wallet

In the next step, your mnemonic phrase will be generated. Make sure no one is able to see your screen during this phase.
Once you’ve proceeded to the next step, you will see your mnemonic phrase and you will be able to view your private key by clicking on “View my Private Key >>” after you have finished writing down your mnemonic phrase.
Binance DEX: Creating a Wallet
The recommended methods of accessing your wallet are with a keystore file or a supported hardware device. 
Storage tips for the mnemonic phrase and private key:
  1. Do not store on an electronic device (computer, phone, etc.).
  2. Do not print them out. Printers have a memory of what they print. 
  3. Hand-write them on paper.
  4. Do not put your private key or mnemonic phrase in your wallet.
  5. Store them in a fireproof and waterproof safe/lockbox.
Congratulations. You’ve created a wallet on the Binance Chain. You may now use the wallet with the Binance DEX.  To learn how to unlock your wallet, continue through to our article on accessing your Binance DEX wallet

How to Deposit on Binance

How to Deposit on Binance

In order to begin trading cryptocurrencies on Binance Exchange, you will need to deposit funds into your Binance account.

Deposit cryptocurrency on Binance

Binance supports trading of over 150 different cryptocurrencies, and you can deposit any one of these onto the exchange. In this example, we will be depositing BNB from Trust Wallet.
From the homepage of Binance, move your mouse up to your profile icon. The icon will be different for everyone and is defined based on the first two letters of your email address.
Once you activate the dropdown menu, you will see an overview of your profile. Click on “Deposit,” and you will be directed to the deposit page. 
How to Deposit on Binance
Once on the deposit page, you will be able to select which coin you wish to deposit. Binance supports the deposit of over 150 cryptocurrencies. However, it’s important to note that sometimes deposits will be unavailable for certain cryptocurrencies if the wallet is undergoing maintenance.
The coin selection is on the left side of the screen, and the deposit details will be displayed on the right side.
How to Deposit on Binance
Depending on the cryptocurrency you have selected to deposit, there may be a specific process to deposit that coin. In the case of BNB, a MEMO is required when depositing BNB to Binance Exchange. Once you have read and understood the warning, select “I understand” and proceed. 
How to Deposit on Binance
After you have continued to the next stage, your BNB deposit address will be displayed on the screen along with the deposit MEMO. If you do not include a memo when depositing, your deposit will be lost.

Why is a MEMO required?

A MEMO is required because the BNB deposit address for all users is identical. The MEMO is a unique identifier assigned to each account that allows Binance to identify a deposit and credit the appropriate account. 
How to Deposit on Binance
Now that you have your deposit details, you can open the wallet that you wish to send the deposit from. For this example, we will be using Trust Wallet on iOS. If you don’t have Trust Wallet, you can download it from the Trust Wallet website.
Once your wallet is open, select the coin you wish to send. In this case, it is BNB. 
How to Deposit on Binance
Now click on “Send.”
How to Deposit on Binance
From this screen, you will need to enter your Binance deposit address and MEMO. The simplest way to input your address is to scan the QR code available on Binance. You can see your QR code by clicking “Show QR Code” on the website.
How to Deposit on Binance
Once you have entered your details you can send the transaction and your Binance account will be credited shortly after.
How to Deposit on Binance

Purchasing cryptocurrency on Binance with credit card

You can also purchase cryptocurrencies using your credit card. To do so, move your mouse up to your profile icon. Once you activate the dropdown menu, click on “Buy With Credit Card” to be directed to the next step.
How to Deposit on Binance
On the next page, you will be able to select which coin you wish to buy, as well as the order amount. The total charge will be displayed according to the order amount and current market price (all fees are included). If you prefer, you can set the total charge first and the order amount will be calculated automatically.
How to Deposit on Binance
When you are ready, click “Buy now.” A window will appear so you can confirm the details of your order. Read the disclaimer and Terms of Use and, if you agree, tick the box and click “Go to payment.”
How to Deposit on Binance
Next, you will be required to fill your credit card details along with your personal information. When you are done, click “Pay now.”
How to Deposit on Binance
Wait for your credit card to be verified.
How to Deposit on Binance
If this is your first Simplex payment, you will be required to verify your email and phone number. You will receive an email and an SMS with a verification code. To finish the verification process, you need to open the link sent by email and insert the code received by SMS. Once you are done, click “Continue.”
How to Deposit on Binance
Next, you will be required to verify your identity using an official document. Please upload a picture of your document along with your personal data and click “Upload Document.”
How to Deposit on Binance
Finally, your documents will be verified and, if approved, you will receive an email stating that your purchase has been confirmed. Your Binance account will be credited shortly with the purchased cryptocurrency.

BINANCE What Is a Limit Order?

BINANCE What Is a Limit Order?

A limit order is an order that you place on the order book with a specific limit price. The limit price is determined by you. So when you place a limit order, the trade will only be executed if the market price reaches your limit price (or better). Therefore, you may use limit orders to buy at a lower price or to sell at a higher price than the current market price.
Unlike market orders, where trades are executed instantly at the current market price, limit orders are placed on the order book and are not executed immediately, meaning that you save on fees as a market maker.

How to use it?

Let’s say you want to sell BNB at a higher price than what is currently being bid. After logging in to your Binance account, choose the BNB market you want (e.g., BNB/BTC) and go to the trading page. Then, find the Limit order tab, set the price and amount, and click the Sell BNB button. You may also set the amount by clicking the percentage buttons, so you can easily place a limit sell order for 25%, 50%, 75% or 100% of your balance.
What is a Limit Order?
After that, you will see a confirmation message on the screen, and your limit order will be placed on the order book, with a small yellow arrow.
What is a Limit Order?
You can scroll down to see and manage your open orders. The limit order will only execute if the market price reaches your limit price. If the market price doesn’t reach the price you set, the limit order will remain open.


What is a Limit Order?

When should you use it?

You should use limit orders when you are not in a rush to buy or sell. Unlike market orders, the limit orders are not executed instantly, so you need to wait until your ask/bid price is reached. Limit orders allow you to get better selling and buying prices and they are usually placed on major support and resistance levels. You may also split your buy/sell order into many smaller limit orders, so you get a cost average effect.

BINANCE What Is a Market Order?

What is a Market Order?

A market order is an order to quickly buy or sell at the best available current price. It needs liquidity to be filled, meaning that it is executed based on the limit orders that were previously placed on the order book. 
Unlike limit orders, where orders are placed on the order book, market orders are executed instantly at the current market price, meaning that you pay the fees as a market taker.

How to use it?

Let’s say you want to create a market order to buy 2 BNBs. After logging in to your Binance account, choose the BNB market you want (e.g., BNB/USDT) and go to the trading page. Then, find the Market order tab, set the amount to 2 BNB, and click the Buy BNB button. 
What is a Market Order?
After that, you will see a confirmation message on the screen, and your market order will be executed.
What is a Market Order?
Since market orders are executed right away, your market buy order will match the cheapest limit sell order available on the order book, in this example 2 BNB for 5.2052 USDT each.
What is a Market Order?
But let’s say you want to buy 500 BNB at the current market price. The cheapest limit sell order available will not be sufficient to fill your entire market buy order, so your order will automatically match the following limit sell orders, working its way up the order book until it is completed. This is called slippage and is the reason why you pay higher prices and higher fees (because you are acting as a market taker).
What is a Market Order?
When should you use it?
Market orders are handy in situations where getting your order filled is more important than getting a certain price. This means that you should only use market orders if you are willing to pay higher prices and fees caused by the slippage. In other words, market orders should only be used if you are in a rush. 
Sometimes you might be in a situation where you had a stop-limit order that was passed over, and you need to buy/sell as soon as possible. So if you need to get into a trade right away or get yourself out of trouble, that’s when market orders come in handy.
However, if you’re just coming into crypto for the first time and you are using Bitcoin to buy some altcoins, avoid using market orders because you will be paying way more than you should. In this case, you should use limit orders.

BINANCE Withdrawal Address Whitelist

How to whitelist a withdrawal address on Binance

The withdrawal address whitelist is another security feature offered by Binance. When the whitelist feature is turned off, your account is able to make withdrawals to any address. When turned on, you will be able to make withdrawals only to the addresses that are whitelisted.
In other words, the addresses that you whitelist will be the only ones able to receive funds from your Binance account. This is very useful because if you ever become a victim of phishing and a hacker manages to invade your account, they won’t be able to withdraw your money.

How to activate it

From the homepage of Binance, move your mouse up to your profile icon. Note that the icon will be different for each account as it is based on the first two letters of your email address. Once you activate the dropdown menu, you will see an overview of your profile. Click on “Security,” and you will be directed to the security page.
Withdrawal Address Whitelist
Then click on the “Address Management” tab.
Withdrawal Address Whitelist
The whitelist toggle will be displayed on the right side of your screen.
Withdrawal Address Whitelist
Turn it on, and you will see a confirmation window like this:
Withdrawal Address Whitelist
Next, you will be required to provide your 2FA authentication. In this case, we are using the Google Authentication app.
Withdrawal Address Whitelist
After turning the whitelist feature on, click on “Add new withdrawal address.”
Withdrawal Address Whitelist
Next, select the coin of your withdrawal address and give it a name (label). In this example, we will add a BNB address generated by the TrustWallet app, so we will label this address “MyTrustWallet.”
Depending on the cryptocurrency you have selected, there may be a specific process to withdraw that coin. In the case of BNB, a MEMO may be required. If you are sending BNB to another account on Binance Exchange, you must include the MEMO. Otherwise, you will lose your funds. Make sure to check whether the address you are sending BNB requires a MEMO.
For TrustWallet addresses, you don’t need to insert a MEMO. If you are sure that you don’t need a MEMO, leave it blank. Next, add the address, check the “Add to Whitelist” box, and click “Submit.”
Withdrawal Address Whitelist
You will be required to provide your 2FA authentication once again.
Withdrawal Address Whitelist
A confirmation email will be sent to you. Follow the instructions in the email to confirm your request.
Withdrawal Address Whitelist
Check if everything is correct. If so, click confirm to finish the process and will you see the following message:
Withdrawal Address Whitelist
Now that your withdrawal address was whitelisted, you may go to your Binance account and check the Address Management page. On this page, you can see and manage all your withdrawal addresses, including the whitelisted ones.
Withdrawal Address Whitelist
You should always have your withdrawal whitelist feature turned on, so you have an extra layer of security over your funds.

binance What Is a Stop-Limit Order?

What is a Stop-Limit Order?

A stop-limit order is one of the many order types you will find on Binance. However, before proceeding with this one, we recommend you to first learn about limit and market orders.
The best way to understand a stop-limit order is to break it down into stop price and limit price. The stop price is simply the price that triggers a limit order, and the limit price is the specific price of the limit order that was triggered. This means that once your stop price has been reached, your limit order will be immediately placed on the order book.
Although the stop and limit prices can be the same, this is not a requirement. In fact, it would be safer for you to set the stop price (trigger price) a bit higher than the limit price (for sell orders) or a bit lower than the limit price (for buy orders). This increases the chances of your limit order getting filled after the stop-limit is triggered.


How to use it?

Let’s say you just bought 5 BNB at 0.0012761 BTC because you believe the price is close to a major support level and will likely go up from here. 

What Is a Stop-Limit Order?
In this situation, you may want to set a stop-limit sell order to alleviate your losses in case your assumption is wrong, and the price starts to drop. To do that, log in to your Binance account and go to the BNB/BTC market. Then click on the Stop-Limit tab and set the stop and limit price, along with the amount of BNB to be sold.
So if you believe that 0.0012700 BTC is a reliable support level, you may set a stop-limit order just below this price (in case it doesn’t hold). In this example, we will set a stop-limit order for 5 BNB with the stop price at 0.0012490 BTC and the limit price at 0.0012440 BTC.

What Is a Stop-Limit Order?

When you click Sell BNB, a confirmation window will appear. Make sure everything is correct and press Place Order to confirm.

What Is a Stop-Limit Order?

After placing your stop-limit order, you will see a confirmation message.

What Is a Stop-Limit Order?

You can scroll down to see and manage your open orders.

What Is a Stop-Limit Order?

Note that the stop-limit order will only be placed if and when the stop price is reached, and the limit order will only be filled if the market price reaches your limit price. If your limit-order is triggered (by the stop price), but the market price doesn’t reach the price you set, the limit order will remain open. 
Sometimes you might be in a situation where the price drops too fast, and your stop-limit order is passed over without being filled. In this case, you may appeal to market orders to quickly get out of the trade.


When should you use it?

Stop-limit orders are valuable as a risk management tool, and you should use it to avoid significant losses. Noteworthy, they are also useful for placing Sell orders to ensure that you take your profits when your trading targets are reached. You may also set a stop-limit buy order to buy an asset after a certain resistance level is breached during the start of an uptrend.

An Introduction to The Dow Theory

What is the Dow Theory?

Essentially, the Dow Theory is a framework for technical analysis, which is based on the writings of Charles Dow concerning market theory. Dow was the founder and editor of the Wall Street Journal and the co-founder of Dow Jones & Company. As part of the company, he helped create the first stock index, known as the Dow Jones Transportation Index (DJT), followed by the Dow Jones Industrial Average (DJIA).
Dow never wrote his ideas as a specific theory and didn’t refer to them as such. Still, many learned from him through his editorials in the Wall Street Journal. After his death, other editors, such as William Hamilton, refined these ideas and used his editorials to put together what is now known as the Dow Theory.
This article provides an introduction to the Dow Theory, discussing the different stages of market trends based on Dow’s work. As with any theory, the following principles are not infallible and are open to interpretation.

The basic principles of the Dow Theory

The market reflects everything

This principle is closely aligned with the so-called Efficient Market Hypothesis (EMH). Dow believed that the market discounts everything, which means that all available information is already reflected in the price.
For example, if a company is widely expected to report positive improved earnings, the market will reflect this before it happens. Demand for their shares will increase prior to the report being released, and then the price may not change that much after the expected positive report finally comes out.
In some cases, Dow observed that a company might see their stock price reduce after good news because it wasn’t quite as good as expected.
This principle is still believed to be true by many traders and investors, particularly by those that make extensive use of technical analysis. However, those that prefer fundamental analysis disagree and believe the market value does not reflect the intrinsic value of a stock.
Some people say that Dow’s work is what gave birth to the concept of a market trend, which is now deemed as an essential element of the financial world. The Dow Theory says that there are three main types of market trends:
  • Primary trend – Lasting from months to many years, this is the major market movement.
  • Secondary trend – Lasting from weeks to a few months.
  • Tertiary trend – Tends to die in less than a week or not longer than ten days. In some cases, they may last only for a few hours or a day.
By examining these different trends, investors can find opportunities. While the primary trend is the key one to consider, favorable opportunities tend to occur when secondary and tertiary trends seem to contradict the primary one.
For example, if you believe a cryptocurrency has a positive primary trend, but it experiences a negative secondary trend, there may be an opportunity to purchase it relatively low, and try to sell once its value has increased.
The problem now, as then, is in recognizing what type of trend you are observing, and that’s where deeper technical analysis comes in. Today, investors and traders use a wide range of analytical tools to help them understand what type of trend they are looking at.
Dow established that long-term primary trends have three phases. For example, in a bull market, the phases would be:
  • Accumulation – After the preceding bear market, the valuation of assets is still low as the market sentiment is predominantly negative. Smart traders and market makers start to accumulate during this period, before a significant increase in price occurs.
  • Public Participation – The wider market now realizes the opportunity that smart traders have already observed, and the public becomes increasingly active in buying. During this phase, prices tend to increase rapidly.
  • Excess & Distribution – In the third phase, the general public continues to speculate, but the trend is nearing its end. The market makers start to distribute their holdings, i.e., by selling to other participants who are yet to realize that the trend is about to reverse.
In a bear market, the phases would essentially be reversed. The trend would start with distribution from those who recognize the signs and be followed by public participation. In the third phase, the public would continue to despair, but investors who can see the upcoming shift will begin accumulating again. 
There is no guarantee that the principle will hold true, but thousands of traders and investors consider these phases before taking action. Notably, the Wyckoff Method also relies on the ideas of accumulation and distribution, describing a somewhat similar concept of market cycles (moving from one phase to another).

Cross-index correlation

Dow believed that primary trends seen on one market index should be confirmed by trends seen on another market index. At the time, this mainly concerned the Dow Jones Transportation Index and Dow Jones Industrial Average.
Back then, the transportation market (mainly railroads) was heavily linked to industrial activity. This stands to reason: for more goods to be produced, an increase in rail activity was first needed to provide the necessary raw materials. 
As such, there was a clear correlation between the manufacturing industry and the transportation market. If one were healthy, the other would likely be as well. However, the principle of cross-index correlation doesn’t hold up quite as well today because many goods are digital and don’t require physical delivery.

Volume matters

As many investors do now, Dow believed in volume as a crucial secondary indicator, meaning that a strong trend should be accompanied by a high trading volume. The higher the volume, the more likely it is that the movement reflects the true trend of the market. When the trading volume is low, the price action may not represent the true market trend.
Dow believed that if the market is trending, it will continue to trend. So, for example, if a business’s stock starts to trend upwards after positive news, it will continue to do so until a definite reversal is shown.
Because of this, Dow believed that reversals should be treated with suspicion until they are confirmed as a new primary trend. Of course, distinguishing between a secondary trend and the beginning of a new primary trend is not easy, and traders often face misleading reversals that end up being just secondary trends.

Closing thoughts

Some critics argue that the Dow Theory is outdated, especially in regard to the principle of cross-index correlation (which states that an index or average must support another). Still, most investors consider the Dow Theory to be relevant today. Not only because it concerns identifying financial opportunities, but also because the concept of market trends that Dow’s work created.

What is an Eclipse Attack?

Introduction

An eclipse attack is a relatively simple attack that a malicious actor may deploy to interfere with nodes on a network. As the name may suggest, the attack aims to obscure a participant’s view of the peer-to-peer network, in order to cause general disruption, or to prepare for more sophisticated attacks.
Eclipse attacks may sound similar, on the surface, to Sybil attacks. While they share certain similarities – the malicious actor will flood the network with fake peers – their end goal is ultimately different. An eclipse attack takes aim at a single node (for reasons explained in a later section), whilst a Sybil attack is a network-wide attack designed to game the reputational system of the protocol.
The concept is discussed at length in the 2015 paper Eclipse Attacks on Bitcoin’s Peer-to-Peer Network, in which researchers from Boston University and Hebrew University report their findings from their experiments in mounting eclipse attacks, as well as possible countermeasures to combat them.

How an eclipse attack works

Bitcoin miners require specialized equipment in order to generate new blocks, but non-mining (or full) nodes are easily run on minimal computational power. This aids the decentralization of Bitcoin, as anyone can spin up a node on a low-spec device. The software maintains a database of transactions that it synchronizes with its immediate peers, so as to remain in lockstep with the network.
A limiting factor for many nodes is bandwidth. Though there is a tremendous amount of devices running the software, the average device is unable to connect directly to many of them due to limitations set out in the Bitcoin software (which only permits a maximum of 125 connections).
In an eclipse attack, the malicious actor will ensure that all of the target’s connections are made to attacker-controlled nodes. The entity will first flood the target with its own IP addresses, which the victim will likely connect to upon the restart of their software. A restart can either be forced (i.e. with a DDoS attack on the target), or the attacker can simply wait for it to occur. 
Once this has occurred, the unsuspecting victim is at the mercy of the malicious nodes – with no view of the wider network, they can be fed incorrect data by the attacker.

Consequences of an eclipse attack

If an attacker is expending the resources to alienate a peer from the network, they probably have a motive to do so. There are a handful of successive attacks that can be more easily launched once a node has been suffocated.

0-confirmation double spends

If an individual accepts a transaction with no confirmations, they’re at risk of a double spend. The transaction may have been broadcast, but until it has been included in a block (and therefore committed to the blockchain), the sender can easily craft a new transaction that spends the same funds somewhere else. If the new transaction has a higher fee, a miner will likely include it before the original, invalidating the earlier one. 
Some businesses and individuals accept these 0-confirmation transactions. Consider a merchant, Bob, who sells high-end vehicles. He is unaware that Alice has eclipsed his node, and suspects nothing as she places an order for a luxury sports car. She creates a transaction, which Bob then broadcasts to the network. Satisfied that the payment is on its way, he hands over the keys to the car and Alice speeds off.
Of course, the transaction wasn’t broadcast to the network – Bob has merely relayed it to Alice’s malicious nodes, which will not relay it to honest nodes. While this transaction hangs in limbo, Alice spends the same funds on the (real) network, whether to another party or to an address she owns. Even if the initial transaction to Bob is eventually seen, it will be rejected as the coins have already been spent.

N-confirmation double spends

The N-confirmation double spend is similar to the 0-confirmation one, but involves more preparation. Many businesses prefer to wait for a certain number of confirmations before marking a payment as valid. To route around this, the attacker must eclipse both miners, and the merchant. Once the attacker has set up the order with the merchant, they broadcast a transaction to the (eclipsed) miners. The transaction is confirmed and included in the blockchain – but this blockchain is not the chain that the majority of the network observe, since the miner is cut off.
From there, the attacker relays this version of the blockchain to the merchant, who releases the goods under the belief that the transaction has been confirmed. Once the eclipsed nodes rejoin the actual network, the blockchain they mistakenly believe to be valid is orphaned by the one that the rest of the network has been working on (this bears some similarities to a 51% attack).

Weakening competing miners

An eclipsed node will continue to operate, oblivious to the fact that they have been segregated from the network. Miners will continue to mine blocks within the rules laid out by the protocol, but the blocks added will be discarded as they sync with honest peers. 
Theoretically, a large-scale eclipse attack on major miners could be used to facilitate a 51% attack. As it stands, the cost to take over the majority of Bitcoin’s hashing power is simply too high for even the most resourceful of attackers – at ~80TH/s, the entity would need more than 40TH/s to attempt such a maneuver. 
In a hypothetical scenario where this hashing power is distributed between 10 parties (such that each owns 8TH/s), the attacker can significantly lower the requirements for a 51% attack by cutting these parties off from the network. If five are eclipsed, 40TH/s is removed from the race to find the next block, and the attacker now only needs to acquire slightly upwards of 20TH/s to take control.
Other sabotage that can be achieved by eclipsing targets includes the manipulation of nodes for selfish mining, or the engineering of races between miners to find the next block.

Mitigation

With enough IP addresses, an attacker can eclipse any node. The most straightforward method of preventing this from happening is for an operator to block incoming connections, and to only make outbound connections to specific nodes (such as those that have been whitelisted by other peers). As the research paper points out, however, this is not an approach that works at scale – if all participants adopt these measures, new nodes will not be able to join the network.
The authors propose a handful of tweaks to the Bitcoin software, some of which have been integrated since the paper’s release. These make eclipse attacks more costly through minor modifications to the code, such as random selection of new connections and greater capacity for storing addresses.

Closing Thoughts

Eclipse attacks are carried out at the peer-to-peer network level. Deployed as a standalone attack, they can be something of a nuisance. Their true effectiveness is in potentiating other attacks that impact targets financially, or provide the attacker with an advantage on the mining front.
In the wild, there has yet to be serious consequences resulting from an eclipse attack, but the threat still exists in spite of the countermeasures integrated into the network. As with most of the attack vectors that exist for Bitcoin and other cryptocurrencies, the strongest defense will be that which makes it financially prohibitive for malicious parties to attempt them.